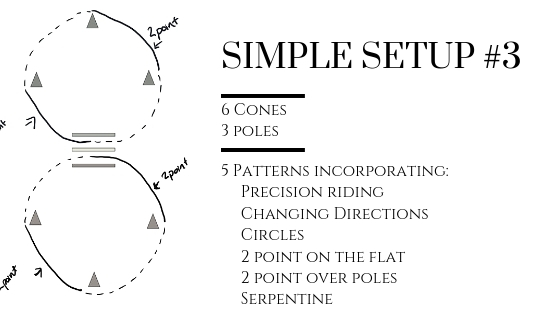
Simple Setup #3 consists of 6 cones and 3 ground poles.
Arena Setup Instructions:
3 ground poles– Set up the three ground poles in the center of the arena (running up the centerline). If you will be trotting over the poles click here for a guide to trot pole distances. Depending on if you will be doing walk or trot work will affect the distance of the poles. Click Here for a guide that has a handy dandy chart with not only feet and meters listed but also ‘paces’ (aka….big steps). I often do not have a measuring tape so I pace things out a lot (…and I mean a lot… like I got weird looks from the realtor because I was pacing out distances…dimensions…of rooms when we were looking at houses). If you are not trotting over the poles you can start with them fairly wide apart (5′ or 6′) then slowly make them closer together to challenge your rider’s accuracy. If you are trotting over the poles it is very important that the distances are set correct for the safety of your rider and horse.
6 Cones– Set up 3 cones on each side of the poles. Cone #2 on each side should be on the centerline and cone #1 and #3 on each side should be as close to the quarter line as possible. Pace or measure out the distance between the cones to make sure you have even distances to help guide an even circle (the pole acts as your fourth marker). I like to have two different color cones if possible to help distinguish between the circles and give me more specific visual cues to reference.
Printed Pattern– Some of the patterns are conceptually complex so having a copy of the pattern or a handheld white board with the pattern drawn out may be a very helpful tool for you.

Pattern #1
In this pattern, have riders start in between two poles then start tracking around the corresponding cones to make a circle. You can play ‘follow the leader’ around the
circle and have your student follow you so they (and the volunteers) can see how to make a circle.
Once the rider has done a few circles going one directions, have them ‘park’ in between the other poles and track the other way around the other corresponding cones.
This pattern could be done with two riders and is a great way to teach riders how to pass each other by having the poles as guides as ‘lanes’ to stay in. For the sake of your brain, I would suggest having both riders tracking the same direction so when you say a certain aid (ex: right rein which is on your outside) it can apply to both riders.
Does your rider have circles fairly well mastered? Remove cones 1 and 3 on each side to give less visual guides for a circle.
Fun variations: Have riders count the number of steps between the poles and cone 1, then cone 1 and 2, then 2 and 3, then 3 and the pole. Were the number of steps the same? Were they different in each quarter? What does it mean when there were a lot more steps in one quarter than the others?
Have riders count the steps in each quarter at the walk then at the trot and compare.
If you have two riders have them each count the steps their horses take in each quarter and then compare. Do they see a correlation between the number of steps and the size of horse?

Pattern #2
Pattern #2 is a great progression from Pattern #1. Once the riders have practiced the
circles at their current gait, you can add in 2 point during certain quarters. Start with one quarter of 2 point then you could progress to half a circle, three quarters, then a full circle (easy measurable outcome). Before turning a rider loose on the circle and adding in 2-point you may want to teach when to shorten/lengthen reins when doing 2 point. This is an important skill for more independent riders since they will be steering.
If you have riders that are a little competitive you could challenge them to see who can hold 2 point the longest while riding an actual circle (and not some mushed version of a circle).
Teaching Tip: Does your rider tend to lean to the left? Try starting them tracking right in a circle so they hopefully feel inclined to lean more to the inside. True…leaning to the inside is usually considered a (common) habit but in this case the natural tendency to lean to the inside could be a great tool for you!

Pattern #3
Pattern #3 incorporates a serpentine pattern longways up and down the arena. Have riders start on the rail, ride down the quarter line and by the cones, turn and ride up the centerline over the ground poles, turn and ride down the quarter line, then end by riding up the rail again. Once the riders have ridden the pattern on or two times you could add in 2 point between the cones and over the poles. For extra challenge you could progress to trotting. For very beginner trotters I would suggest adding in the trot between the cones first. For more advanced trot riders you could have them trot the full pattern and reinforce appropriate posting diagonals and add in the 2 point.
Use the cones at each end of the centerline as visual markers for your riders to look towards when they are riding over the poles. This will give them something to look at instead of looking down at the poles as they are riding over them.
Safety Tip– School your lesson horses over the poles at the trot before you allow your students to trot over them. This will allow you to see how the horse behaves going over the poles (some thing it is a giant fence and jump, not trot, over the poles) and also get an idea of what distance your poles will need to be set.

Pattern #4
Starting with the black ‘tracking’ marks: In this pattern, have your riders start at the green cone on the centerline. The rider will then ride down the centerline and over the three poles. When they get across from the orange cone on their right they will turn towards that cone and go straight towards the arena rail. They will track left and continue along the rail until they get to the orange cone on the centerline. At this cone they will ride up the centerline and repeat the same steps as before [follow the blue ‘tracking’ marks]
Be sure to add in left turns towards the cones as well. You could also incorporate the trot in pieces of or the entire pattern as a progression.

Pattern #5
In this pattern have the rider start out on the arena rail. When they get across from
the poles have them turn and go through the bottom pair of poles on the ground and straight across to the other side of the arena. At the other side have them turn left and ride along the arena rail until they get to the orange cone on the centerline. The riders will then turn up the centerline and ride over the poles. When they get to the green cone on the centerline they will turn right and continue along the rail until they are across from the poles. They will then turn and walk through the top pair of poles straight to the other side. The rider then tracks right and continues along the rail. You could continue the pattern by going down the centerline, tracking left, going through the poles, track right, etc.
Riding Skills to Focus on:
Remember that as an adaptive (therapeutic) riding instructor you should be focusing on teaching a riding skill(s) during your lesson and reinforcing them with a pattern. Don’t get stuck on teaching the pattern and leave out teaching the necessary riding skills.
Shorten/Lengthen Reins– This skill can be incorporated as the riders go in/out of 2 point, over the poles, in/out of the trot, etc. Use the cones as visual markers for your riders on when to shorten their reins for a certain task like 2 point or trotting. This skill is very important for riders to be familiar with before you turn them loose and have them steering while in 2 point, before they trot independently, and most certainly before they 2 point or trot over poles. Appropriate rein length helps to reinforce proper body mechanics because a rider does not have to over exaggerate steering, often loosing balance, just to get pressure applied to the reins to turn the horse.
Reining– in a straight line, around corners, in a circle. For progression in reining you could have a rider go from needing physical or verbal prompts to less or no prompts. A rider could progress from riding on lead to riding off lead. Don’t forget the Hi-Five method if you are stuck with a rider using their reins to turn. Utilize the cones as visual markers to help give your riders somewhere to look. You can tell them to “keep their horses ears pointed towards the cone”. Skill progression on this may be something along the lines of a rider doing the pattern on-line with physical or verbal help from a volunteer or instructor to doing the pattern offline with fewer/no physical or verbal aids from the support team.
Looking Ahead– This skill should be reinforced no matter what level of rider. This pattern has several cones as visual markers for your riders to be ‘looking ahead’ to. Looking ahead helps to reinforce proper body mechanics while riding in a straight turn and also while turning. Skill progression on this could be that you go from telling your riders where to look next to asking them where they should be/are looking.
2 point– Best practice is to do 2-point on the flat before progressing to doing it over an obstacle such as the ground poles. You can then progress to riders holding 2 point over the three poles. Use your cones and the arena rail as looking points for your riders. Looking forward in 2 point greatly helps the riders to be able to have appropriate body mechanics during this skill. 2 point can be done at all three gaits as well, just remember appropriate review of slower to faster gaits and on the flat to over obstacles. This gives you time to assess how your student and horse are working together that day and make safe decisions on if you need to adjust your plan depending on how things are going, the impact of the weather, etc.
Bending- Incorporate bending around the circle and/or corners. I personally like to teach riders to squeeze or ‘hug’ with the inside leg as you turn with the same (inside) rein. If it is not too much for the rider you can also explain that they can think about pushing the horse’s stomach out to the rail or their outside rein. I teach riders to use the outside rein for bending later as it is often a more complex and more difficult to understand skill if you are using diagonal aids (inside leg, outside rein) vs. lateral aids (inside leg, inside rein).
Passing Another Horse– If you use Pattern #1 or #2 you can teach riders how to pass another horse while using the poles as guidelines or ‘lanes’ for your rider. School your horses together to make sure there is no underling rivalry that will ignite in class when they are passing!
Terms
Remember that even though most of the terms are second nature to us, they are completely foreign to your riders.
Centerline- Runs straight down the middle of the arena longways. Often you say you ride ‘up’ or ‘down’ the centerline. (you would walk over the three poles set on the centerline)
Midline- The midline runs straight across the arena short ways. Often you say you go ‘across’ the midline. (you would walk through the poles when going across the midline)
Tracking Left– Riding around the arena so that your left shoulder is to the inside.
Tracking Right– Riding around the arena so that your right shoulder is to the inside.
Over vs. Through– Visually show the difference by walking over and through the poles as you explain verballyUp vs. Down– you will have to determine the ‘bottom’ of your arena for this reference. Note that all patterns above the ‘bottom’ of the arena is the bottom of the image so if you ride your horse ‘up’ the centerline you would be riding from the bottom of the image to the top of the image.Continue along the rail– Keep riding your horse next to the arena fence Click Here for a great resource that gives other dressage terms, geometry, and a ‘map’ of the arena!
Written by Saebra Pipoly. Learn more about the author by clicking here.
Send Saebra an email at saebra.p@hooffallsandfootfalls.com, subscribe to the Hoof Falls & Footfalls newsletter, follow on instagram, and subscribe to the YouTube channel!
Want to easily design, edit, and share your own arena setups? Check out the Samsung Galaxy Tab with S Pen