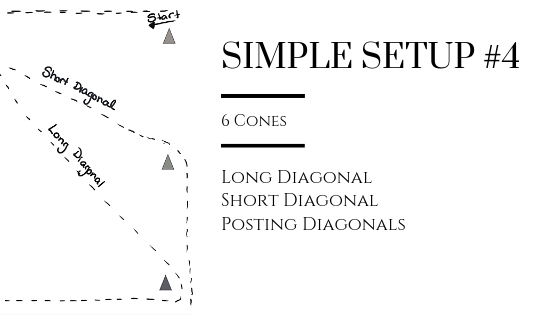
This simple setup focuses on ‘diagonals’…both diagonal lines and posting diagonals…while only using 6 cones.
Arena Setup Instructions
6 Cones– 3 running down each side of your long rail. The cones should be far enough off the fence so the riders can ride between the cones and the fence. Different colored cones are suggested (as shown in the arena diagram) so the Instructor has the visual aids to help clearly explain where the rider needs to go.
Printed Pattern– Some of the patterns are conceptually complex so having a copy of the pattern or a handheld white board with the pattern drawn out may be a very helpful tool for you.

Pattern #1
Start by having your students learn the difference between the ‘long diagonal’ and ‘short diagonal’ at the walk.
For the Long Diagonal: Have your riders begin between the fence and one of the
cones in the first corner of a short rail. Ask them to proceed at the walk along the short rail to the next cone so they can go ‘around the cone’ and across the LONG diagonal. The student should taking their horse in a straight line to the cone in the diagonal corner (hopefully the same color cone as the one they just turned around). As they come to the cone that ends their long diagonal line, they should be on the side that allows them to go around the cone so they are between the fence and the cone. The rider will now be tracking the opposite direction around the arena. You could have your rider do a lap all the way around before starting a diagonal line again or they could go into another diagonal line in the next corner.
For the Short Diagonal: Have your riders begin between the fence and one of the cones in the first corner of a short rail. Ask them to proceed at the walk along the short rail to the next cone so they can go ‘around the cone’ and across the SHORT diagonal. The student should take their horse in a straight line to the cone in the middle on the opposite rail (hopefully a different color cone than the one they are at). As they come to the cone marking the end short diagonal (green in the diagram), they should go around the cone so they are between the fence and the cone. The rider will now be tracking the opposite direction around the arena. You could have your rider do a lap all the way around before starting a diagonal line again or they could go into another diagonal line in the next corner.
Practice Identifying the Middle- After your students grasp the concept of long and short diagonal lines, have them learn how to identify the middle of the diagonal lines (this concept is important for laying the foundation of where to changing the posting diagonal, canter leads, bend, etc). Start by having your student stand in the middle of the long diagonal line at a whoa and ask them to look at the cone in front of them and then behind them. Also ask them to look across on the left to right sides as they should see that the ‘middle’ of their long diagonal line should line up with the cones in the center of the long rail (green cones in diagram). Have them walk on and complete the diagonal line. Ask your student to walk a long diagonal line and verbally call out ‘center’ or ‘middle’ when they reach the middle of their long diagonal line. The next time through a long diagonal line, ask the student to call out when they think they are in the middle. Repeat with the same steps (starting by stopping in the middle of the short line) while your rider is on the short diagonal.

Pattern #2
Once your student is comfortable with the long and short diagonals at a walk, then you could progress to a trot. I would suggest having the concept of the diagonal lines fairly solid at the walk before progression to the trot because if the rider turns the wrong way at the end of the diagonal line, the turn can be very sharp which is not beneficial for horse or rider.
Practicing the long and short diagonals are a great way to also practice changing diagonals. If the student is still learning how to identify being on the correct posting diagonal, the instructor could help them get on the correct post before they go into a change of diagonal and also verbally prompt the student when/how to change the post when they are in the middle of the diagonal line.
Note: There are various theories and preferences on riders should change the post coming out of a corner onto the line or in the middle of the diagonal line. Learning how to identify the center of a line is a great skill to have (spatial awareness) which is why changing the post in the middle of the line is beneficial to learn. However, depending on the horse, rider, skill level, etc….what works ‘best’ for a rider/horse combo depends. Don’t get stuck on thinking that you can ‘only’ change in the middle or ‘only’ after a corner. This post from Practical Horsemen does a great job explaining the thought process behind trying different areas to change the post.

Pattern #3
Once your student is comfortable changing their posting diagonal on a straight line, a fun change of pace is to have them practice changing their post in a shallow loop.
This arena setup is also a great way for your student to practice changing the
bend of their horse at the walk and trot. At the ‘x’ they could also begin changing the bend of the horse. Read this article from the Digital Horse that has a more detailed explanation about when/where to change the bend along a shallow loop at the walk and trot.
This pattern at the canter is very complex as it would either involve two consecutive lead changes along the long rail or counter canter. Unless you are working with a very advanced rider, I would not suggest this pattern at the canter.
Riding the pattern: Have your riders begin between the fence and one of the cones in the first corner of a short rail. Ask them to proceed at the walk along the short rail to the next cone so they can go ‘around the cone’ in the next corner. As they go around the cone have them prepare for steering to the inside of the next cone down the long rail, prepare for a change of post, prepare for a change of bend, etc. (whatever is appropriate for that level of rider). As they come to the inside of the middle cone, prepare them for guiding their horse back to the rail and going around the third cone in the line (the cone in the corner). Again, you could prepare them to change their post, change the bend, etc. depending on their skill level.
Riding Skills to Focus on in Patterns 1-3:
Remember that as an adaptive (therapeutic) riding instructor you should be focusing on teaching a riding skill(s) during your lesson and reinforcing them with a pattern. Don’t get stuck on teaching the pattern and leave out teaching the necessary riding skills.
Posting Diagonals- Posting diagonals are an important skill for everyone who trots to learn no matter what discipline they ride. Posting diagonals are not just an ‘english’ thing. Posting diagonals have a huge impact on horse and rider mechanics and there are several ‘whys’ behind their importance. Read this response to a poster question to Barn Mice, who does a wonderful job explaining a few of the various ‘whys’ behind why it is important.
Riders first learning posting diagonals may need verbal prompts from the instructor to help them get on the correct post, change posts, and identify what post they are on. Different riders pick up identifying posting diagonals at different speeds. Don’t get frustrated if it takes months, or years, of verbal support from the instructor to help the rider with the correct posting diagonal. For the sake of your horse and also developing the riders ‘feel’ for the post, please don’t get discouraged and just shrug your shoulders and give up on the posting diagonals because the rider can’t identify it themselves. Help them with prompts as long as they need.
Bending- Begin incorporating bending around the corners going in and out of the diagonal lines of the patterns above. Then progress to changing bend along the shallow loop line. I personally like to teach riders to squeeze or ‘hug’ with the inside leg as you turn with the same (inside) rein. If it is not too much for the rider you can also explain that they can think about pushing the horse’s stomach out to the rail or their outside rein. I teach riders to use the outside rein for bending later as it is often a more complex and more difficult to understand skill if you are using diagonal aids (inside leg, outside rein) vs. lateral aids (inside leg, inside rein). Take care to also focus on the rider’s body position during bending. Don’t allow your riders to collapse to one side, lean, drop a shoulder, over turn the shoulders, etc. Reinforce good body mechanics all the time no matter the level of rider! If you want a great book on body mechanics check out this book by Mary Wanless.
Inside/Outside– Learning the inside and outside of your horse (and bend) is a great skill to learn! As your rider changes direction across the diagonal, point out to them that they now have a new inside/outside rein or leg. If suitable for the rider you could ask them to tell you what the inside or outside rein or leg is each time they change directions. Take note though that the shallow loop (Pattern #3) is a little more tricky! The blue and black lines are visual cues of when the horse (should) have a new inside/outside due to their bend and how they are turning.
Reining– in a straight line, around corners, in a circle. For progression in reining you could have a rider go from needing physical or verbal prompts to less or no prompts. A rider could progress from riding on lead to riding off lead. Don’t forget the Hi-Five method if you are stuck with a rider using their reins to turn. Utilize the cones as visual markers to help give your riders somewhere to look. You can tell them to “keep their horses ears pointed towards the cone”. Skill progression on this may be something along the lines of a rider doing the pattern on-line with physical or verbal help from a volunteer or instructor to doing the pattern offline with fewer/no physical or verbal aids from the support team.
Looking Ahead– This skill should be reinforced no matter what level of rider. This pattern has several cones as visual markers for your riders to be ‘looking ahead’ to. Looking ahead helps to reinforce proper body mechanics while riding in a straight turn and also while turning. Skill progression on this could be that you go from telling your riders where to look next to asking them where they should be/are looking.
Terms
Remember that even though most of the terms are second nature to us, they are completely foreign to your Students
Tracking Left– Riding around the arena so that your left shoulder is to the inside.
Tracking Right– Riding around the arena so that your right shoulder is to the inside.
Inside vs. Outside– (this one gets a little tricky depending on where your rider is at skill wise and also their cognitive level) Simple: inside is towards the middle of the arena, outside is towards the arena rail. Complex: Inside is the side that you are turning or bending into, outside is the side that you are turning or bending away from.
Continue along the rail– Keep riding your horse next to the arena fenceLong rail vs. short rail: Long arena rails are the two longest sides of the arena, short arena rails are the two shortest sides of the arena.
Click Here for a great resource that gives other dressage terms, geometry, and a ‘map’ of the arena!