
Remember learning how to fold paper either the the ‘hotdog’ (longways) or ‘hamburger’ (shortways) way when you were younger? Apply that fun skill to your next set of lessons!
This arena setup plays off of the ‘hotdog’ and ‘hamburger’ folds by labeling the centerline of your arena the ‘hotdog’ and the midline of your arena the ‘hamburger’. Poles are added into the arena setup so there is a visual for your riders when walking over the centerline or midline.
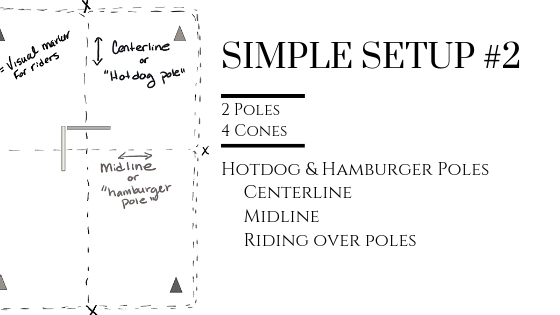
Arena Setup Instructions:
- Cones– set in each corner far enough away from the rail so the riders can ride around them (this helps reinforce riding into corners). I like using two different color cones if possible so you can give your riders prompts like “turn towards the orange/blue cone”.
- Ground poles– set on the centerline and midline of your arena. Having two different colored poles helps as well so your riders again have a visual for which pole is the ‘hotdog’ (centerline) or ‘hamburger’ (midline) pole.
- Visual Markers– Having some type of visual markers setup at the ends of your centerline and midline is a great tool. This visual marker could be dressage letters (C,A and E,B respectively) or something as simple as colored duct-tape wrapped around the railing
- Paper– have some paper handy so you can have your riders fold the paper in the ‘hotdog’ and ‘hamburger’ styles. Other ways you can reinforce this is to have them then trace the fold lines with their fingers, write the words ‘centerline’ and ‘midline’, etc. You can do this prior to mounting or have them do it while mounted (of of course school your horse to make sure they are ok with paper being folded on their back!!!)
- Volunteers- Have extra volunteers that you need to give a ‘job’? Swap out volunteers for cones or the ‘x’ visual points…they are now your living cones! Take it a step further and give each volunteer a thing to watch for. For example, you can give one volunteer the task of checking for heel position, another hand position, etc. Empower your volunteers though teaching them what to look for (even if they are not ‘horsey’) and incorporate them into the lesson. This also helps you become more efficient as an instructor. Don’t forget to praise your volunteers for doing a great job as a cone or cuing a position correction and riders for attempting or making the necessary change.
Pattern and Riding Skill Suggestions for the Simple Setup

Image 1 shows tracking lines that has the rider ride over the ‘hotdog’ or centerline pole then continue along the rail, making sure to go around the cones in the corner. The riders can then also go over the ‘hamburger’ or the midline pole. I would suggest using this pattern first as you can have the riders up/down the the centerline a few times then switch to going across the midline.

Image 2 shows tracking over the ‘hotdog’ or centerline pole, riding along the rail then going across the ‘hamburger’ or midline pole and changing directions. This pattern is a little more complicated as you are asking your riders to change from up/down the center line and turning to the right to then going right into going across the midline and turning left.
Riding Skill Incorporation & Skill Progression
Riding in a Straight Line– I always joke that riding in straight lines and circles are the two hardest things to do and teach! Reining and keeping the horse on a straight line and over the center of the pole while going up/down the centerline (‘hotdog’ pole), across the midline (‘hamburger’ pole), or down the rail may be more than enough challenge for your rider! Utilize your visual markers and cones to help give your riders somewhere to look. You can tell them to “keep their horses ears pointed towards the marker”. Skill progression on this may be something along the lines of a rider doing the pattern on-line with physical or verbal help from a volunteer or instructor to doing the pattern offline with fewer/no physical or verbal aids from the support team.
2 point– first incorporate/review 2-point by having riders hold it while walking along the rail from corner cone to corner cone. You can then progress to riders holding 2 point over the midline or centerline pole. Use your cones and the visual markers as looking points for your riders. Looking forward in 2 point greatly helps the riders to be able to have appropriate body mechanics during this skill. Best practice is to do 2-point on the flat before progressing to doing it over an obstacle. 2 point can be done at all three gaits as well, just remember appropriate review of slower to faster gaits and on the flat to over obstacles. This gives you time to assess how your student and horse are working together that day and make safe decisions on if you need to adjust your plan depending on how things are going, the impact of the weather, etc.
Looking Ahead– This skill should be reinforced no matter what level of rider. This pattern sets you up to have multiple visual markers for your riders to be ‘looking ahead’ to. Looking ahead helps to reinforce proper body mechanics while riding in a straight turn and also while turning. Skill progression on this could be that you go from telling your riders where to look next to asking them where they should be/are looking.
Transitions– You can easily incorporate walk-halt-walk transitions at the corner cones, walk-trot-walk or trot-canter-trot transitions down the rail from cone to cone, etc. The options just depend on your skill level of rider! Don’t forget to reinforce good body mechanics of sitting tall, staying centered, and looking ahead during transitions.
Teaching tip: Be aware of where you are standing in the arena and try to find the best place to stand so that you can easily check your rider(s) aliment and have ‘eyes’ on all your students.
Terms
Centerline- Runs straight down the middle of the arena longways. Often you say you ride ‘up’ or ‘down’ the centerline. (this is your ‘hotdog’ line in the patterns above)
Midline- The midline runs straight across the arena shortways. Often you say you go ‘across’ the midline. (this is your ‘hambuger’ line in the patterns above)
Click Here for a great resource that gives other dressage terms, geometry, and a ‘map’ of the arena!
Want to easily design, edit, and share your own arena setups? Check out the Samsung Galaxy Tab with S Pen
Written by Saebra Pipoly. Learn more about the author by clicking here.
Send Saebra an email at saebra.p@hooffallsandfootfalls.com, subscribe to the Hoof Falls & Footfalls newsletter, follow on instagram, and subscribe to the YouTube channel!