Practicing Emergency Dismounts in both adaptive riding** and traditional able bodied riding can be fun and also help your students feel more confident, stay safe, minimize injuries, and make a scary situations less scary by hopefully preparing the rider to be in some control of a ‘what if’ situation that may arise when riding.
Note that a ‘rider led’ emergency dismount is different than a ‘volunteer/instructor’ led emergency dismount.
‘Emergency Dismount’ may have a scary sound to it but it is a skill that does not need to be a scary thing! How your students feel about the skill is greatly impacted by the delivery! I have had several students (both in adaptive and traditional lessons) ASK to practice (rider led) Emergency Dismounts at the end of a lesson because they have fun doing them!
In my lessons, before a rider is allowed to go ‘off line’, or ride independently without someone holding on to the lead rope of the horse, one of the things they must demonstrate to me is a rider led/controlled Emergency Dismount. This could either be done physically and/or verbally depending on the ability of the rider. Practicing Emergency Dismounts can sometimes look a little different in adaptive vs. able bodied students but they both have similar mechanics and basic steps. Because a rider led Emergency Dismount looks similar in both adaptive and able bodied riding, I will cover the basics below and give notes if there are extra tips or thoughts as applied to either specific lesson type.
Emergency Dismount- Able Bodied Riding
Before the student is allowed to ride ‘off line’ without me within arms reach of the horse and/or holding on to a lead rope, they must be familiar and comfortable with the steps of the Emergency Dismount. The Emergency Dismount is usually taught in the first or second lesson, practiced for the next three or four lessons, and then occasionally reviewed as needed.
Emergency Dismount- Adaptive Riding
Before the student is allowed to ride ‘off line’ without volunteers supporting them by being within arms reach of the horse and/or rider, they must be familiar and comfortable with the steps of the (rider led) Emergency Dismount (again, a reminder that this is different than a volunteer led/controlled emergency dismount). For riders who may not be able to fully control the emergency dismount due to physical limitations, it is very important that they understand how they can best dismount in an emergency and also clarify with them that they may hit the dirt if the instructor or volunteer is not there to assist them down due to their physical limitations. Riders with physical limitations may need to have adaptations in the traditional steps of the Emergency Dismount below. In addition to talking with the rider, it is also very important to clarify the WHAT and WHY of the Emergency Dismount is with any parents/guardians as sometimes they do not understand the risk associated with more independent riding.
You may occasionally run into a student or family that do not want to take the ‘risk’ of progressing towards riding independently. That is a challenge you will hopefully not encounter, but may honestly happen.
Tips for teaching Emergency Dismounts tips (Able bodied and adaptive)
- Verbalize the WHYS and the steps of the HOW first and have the student repeat them back to you before they attempt the emergency dismount. If possible, have the student(s) verbalize the HOW steps as a volunteer rider does the Emergency Dismount in front of them so they can see the process
- Adaptive riding specific- If riders are unable to verbalize the steps have them show you the process as you count out ‘step 1’, ‘step 2’, etc. OR have them sign the numbers as a volunteer rider demonstrates the process.
- Use the review time before you physically practice to answer any questions they may have and do your best to word things in a positive way to hopefully avoid building fear in a rider. Give reasons WHY they need to know this skill.
- Reinforce good body mechanics every time and adapt technique as needed depending on the physical ability of the rider.
- Stay next to the rider and assist them down if needed the first few times until they are comfortable and/or as necessary depending on the physical limitations. Talk through it at a whoa first if needed then try it from a walk the next lesson.
- Consistently review the emergency dismount so it is a familiar skill for your riders. This is especially important with students who have difficulty with sequencing, obtaining long term memories, resist unfamiliar activities, etc.
- Horse tip- Don’t force your horse to keep walking if they stop when the rider begins their emergency dismount. I praise mine when they stop as this is what I have trained them to do…and what I hope they do if a rider truly does become off balance! If you have volunteers with you, give them the WHY behind not forcing the horse to move forward as it will stick in their brain better
- Start at the walk but challenge your riders by having them then progress to the trot or canter.
Basic STEP-by-STEP of a Rider Led Emergency Dismount:
Before teaching the HOW, or steps we talk about:
WHAT is the Emergency Dismount: It is something that a rider may need to do if they have to get off of their horse suddenly.
WHY do we need to learn how to do an Emergency Dismount: If you ever lose control of your horse, your equipment breaks, you loose your reins, etc. you may need to do an Emergency Dismount. It is better for a rider to be in control of getting off of their horse, even in an emergency, so they can hopefully avoid major injury.To add in some fun I usually have the riders make up a silly reason why they need to do an emergency dismount. I’ve heard everything from there is a “tornado in the arena” to “my horse wants to go eat cake in the barn”.
Learn more about the importance of incorporating Whats, Hows and Whys in your lessons in THIS BLOG
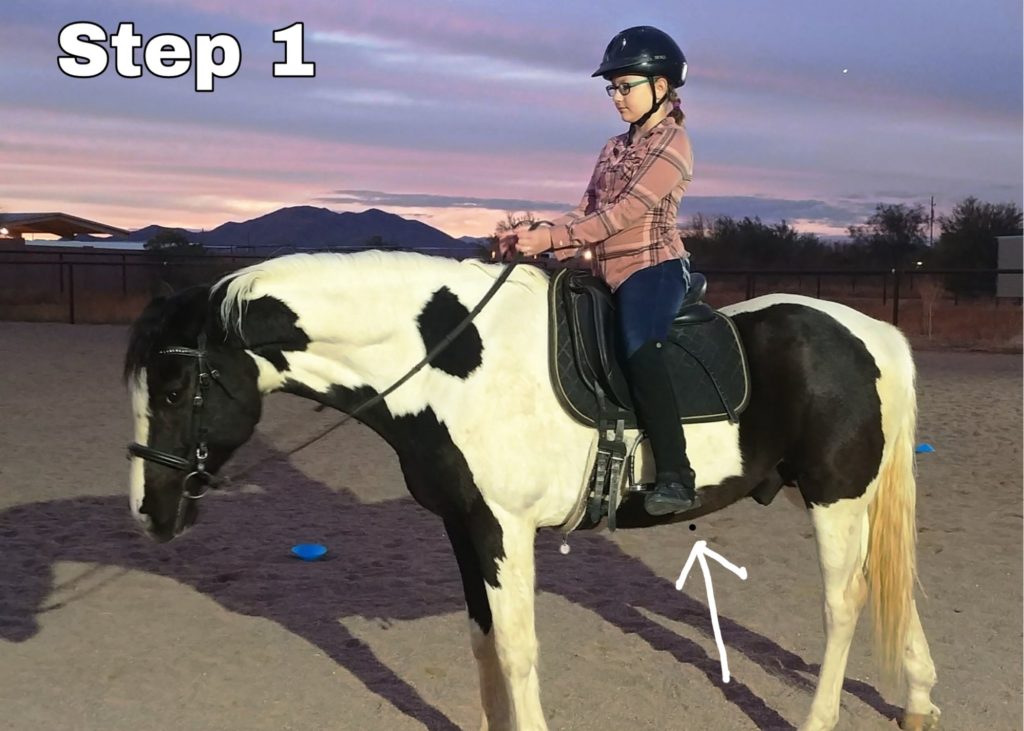
Step 1: Feet out of the stirrups
If your rider cannot remove their feet from the stirrups, assess what type of stirrup and/or other safety features are needed to help ensure their safety. Other safety features may be riding in a peacock or S-stirrup, fully enclosed stirrup, riding with the stirrup bar down on the saddle, etc.
White Arrow: Both feet are completely free from the stirrups.
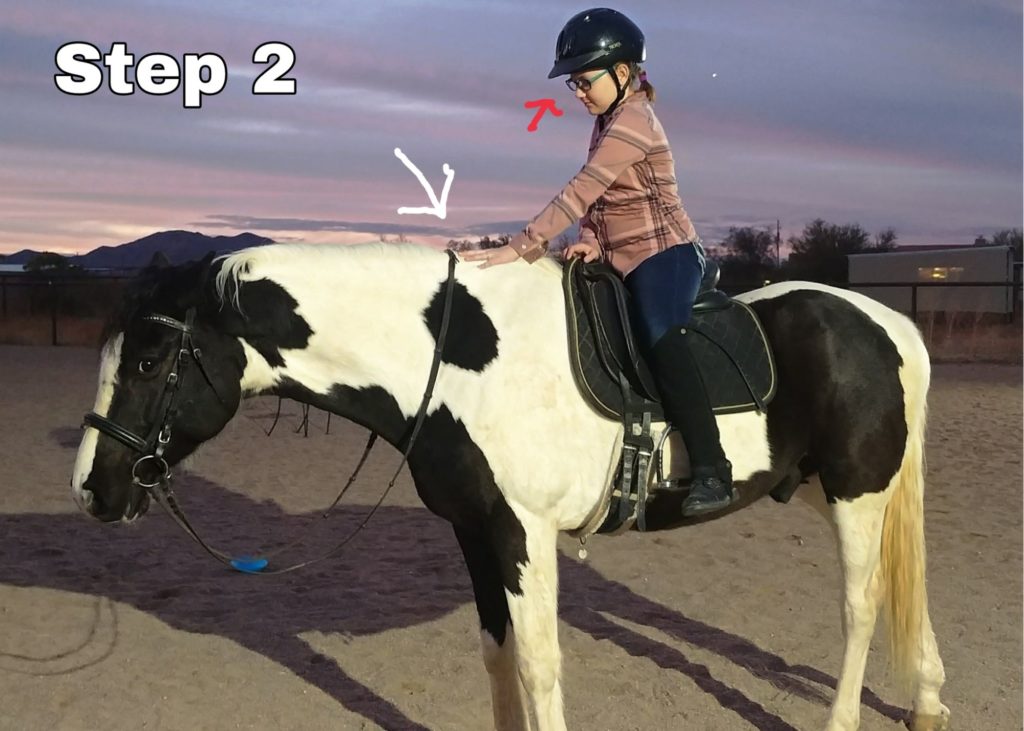
Step 2: Reins down on horse's neck
Often a low key emergency dismount is needed because a rider has lost their reins due to a horse dropping their head to food, shaking their head, or other various reasons. Emergency Dismounts don’t always have to be in fast paced, spook initiated situations. (hint: this can be a WHY point!)
White Arrow: left hand is forward on horse’s neck, right hand is on pommel of saddle. Red Arrow: Next time I would have rider look forward at the horizon to enable better body mechanics
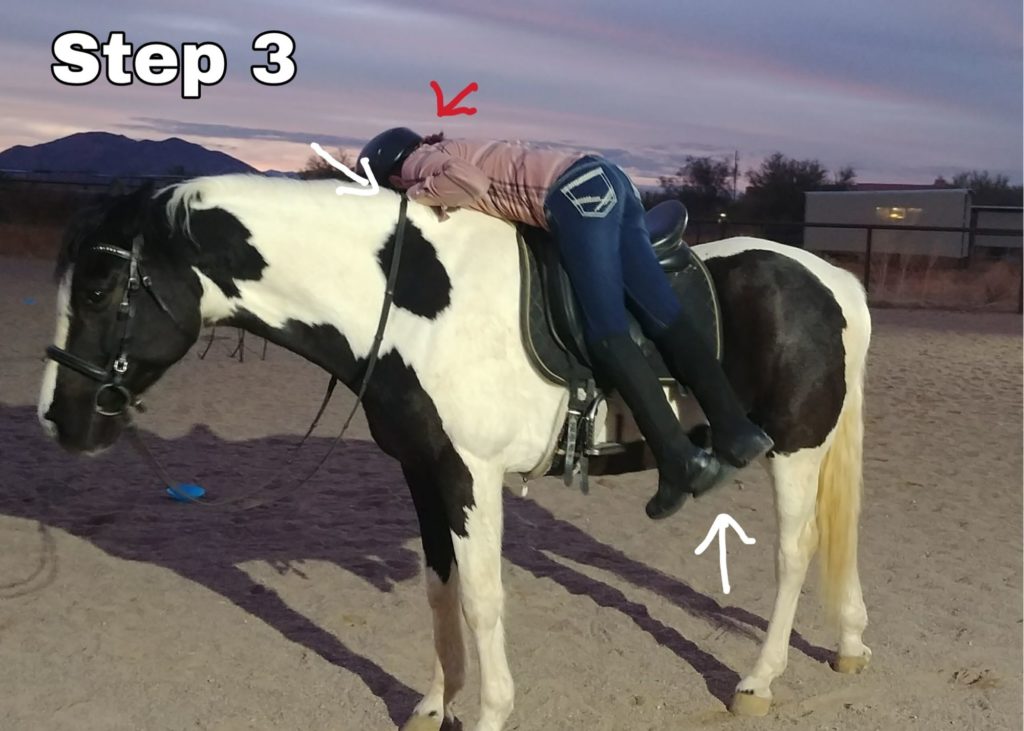
Step 3: Dismount your horse
Key body mechanics to focus on: Leg coming up and over the horse’s back needs to remain fairly straight to clear the hind end and saddle. Rider’s eyes stay looking at the horizon and to the side of the horse that they are not dismounting on as this helps them maintain balance and not slide off to one side before feet are under them. One hand stabilizes on the front of the saddle while the other reaches slightly up the neck to help provide stability. Core stays centered over the back of the horse, again helping with balance and not sliding off before feet are under. Land with ‘bouncy’ knees and ankles to help prevent injury and/or soften the fall if your bum hits the dirt.
White Arrow: Feet and legs are together and ready to land. Red Arrow: Again, I would encourage the rider to look forward at the horizon so they do not fold over the back of the horse.
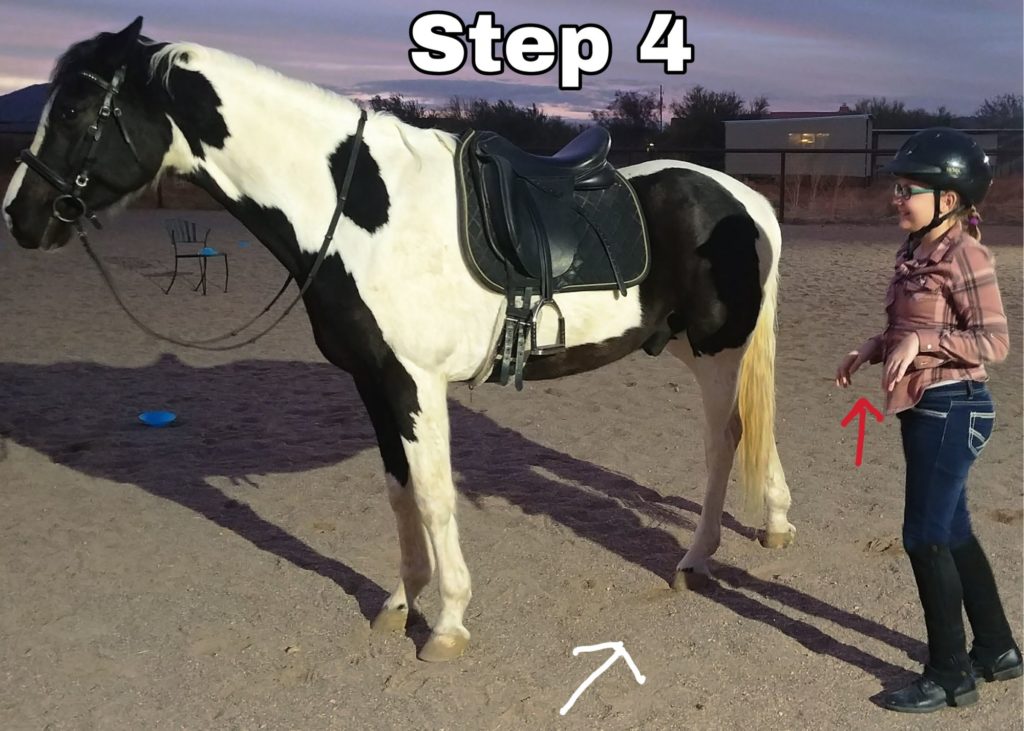
Step 4: Tuck your arms and back away from your horse
Tucking arms in is super important! If a rider does not get in the habit of tucking their arms in as they land they may try to catch themselves if they fall back and break an arm (speaking from personal experience).
Let them know it is ok if their butt hits the dirt at this time and that landing feet first, as controlled as possible, and arms tucked helps keep important body parts safe.
White Arrow: Rider has backed away from the horse. Red Arrow: Encourage riders hands to come up and closer to body in a more ‘tucked’ position.
The above steps are a very simple Task Analysis of the emergency dismount. Read THIS BLOG on Task Analysis to learn more!

** I personally chose to use the term Adaptive Riding vs. Therapeutic Riding and avoid ‘horse therapy’ at all costs. Why? CLICK HERE. The thoughts shared in the post above apply to not only Adaptive riding but also to other mounted equine activities and therapies offered at an EAAT (Equine Assisted Activity and Therapy) Program/Center/Barn.
Affiliate links may be provided in this blog post. Affiliate income helps HF&FF be able to continue to provide free and low-cost adaptive riding instructor education and resources!