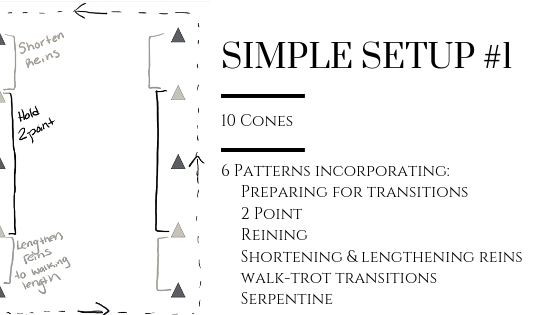

Sometimes all it takes is a few examples of how to use a tool, in this case the arena setup, to get your own creative juices flowing! This post will cover several different patterns that utilize the arena setup shown to the left in your lessons.
I recommend using two different colors of cones/markers as shown in the setup image as this will help you explain the pattern more clearly and cater visually to your riders. You can also vary the distance of the cones from the fence depending on if this is a rider who rides independently or if you need to fit a ‘full team’ (Horse Leader, Horse, Rider, and 2 Sidewalkers) between the cones and the rail.
The pattern suggestions below are just a few ways to use the setup….the options are endless!
Do you have a unique way to use this arena setup that is not listed below? If so, shoot me an email and I would love to feature your suggestion!

Arena Pattern Suggestion #1
The image shown to the right shows a serpentine-ish pattern through the cone (this is not a ‘true’ serpentine because the lines going across the arena are not straight.).
A suggestion for explaining this pattern is to tell your students to “go around the cones” which will help keep them on the correct side when turning and that they should “keep their horse in between the cone and the fence”.
Basic to more advanced riding skills that can be practiced:
1. Reining- riders can rein their horses through the pattern. Still working on the fundamentals of reining? Try hi-fives as the rider turns around the cones. (CLICK HERE for a video showing the hi-five ‘steering’ method)
2. Straight lines- reinforce straight lines down the arena rails and from cone to cone when going across the arena (true…there is a slight diagonal)
3. Bending- teach riders how to bend their horse around the cones. My very simplified version of teaching bending is “as you turn with your left rein, give your horse a gentle hug/tickle around his barrel with your left leg” You can also use a funny ‘visual’ and ‘kinethetic’ explanation of how people move ‘away’ from a tickle in their side and gently poke/tickle a rider in the side or have a volunteer do it to you. This visual can help them grasp the idea of ‘bending’ their horses and that their horse moves away or around leg pressure
4. Looking ahead/looking around corners- reinforce looking ahead by coaching your rider to look at the next cone they are turning to (instead of down at the one they are going around). If you have volunteers with your students, this is a very easy task to ‘delegate’ to your volunteers to help them be more effective at coaching the rider they are with. For more advanced riders you could ask them what cone they are looking at during any point in the pattern.
Arena Pattern Suggestion #2
This arena setup is a progression from the original serpentine-ish pattern from the #1 suggestion. Suggestion #1 could act as a warm-up/review then riders could progress to this suggested pattern.
In this pattern, the rider holds 2-point during the straight aways, sits before the cone and turn, sits while walking along the wall, then resumes 2-point after turning. If your rider has not learned 2-point yet, I suggest starting with pattern #3 first to work on 2-point along the rail first.
Riding skills that can be reinforced in this pattern:
1. 2-point at the walk
2. Reining while in 2-point. It is much more difficult to keep a horse going straight across the arena than walking along the wall so you may want to make sure your student’s can steer their horse while in 2-point along the wall before you turn them loose on this pattern (See Suggestion #3 and #4 for ways to practice steering along the rail)
3. Transitioning from Sitting/2-point/Sitting position. This pattern reinforces riders repetitively going from sitting to 2-point and back to sitting and having to find proper body aliment for each position.
4. Looking ahead- If your rider struggles with looking down while in 2-point, this is a great pattern for them as this gives them very specific points to look at while in 2-point.

Arena Pattern Suggestion #3
This pattern is a great way to measure progress for the length of time a rider is able to hold 2-point along the rail. This is also a great starter pattern for teaching riders to steer while in 2-point by using the rail to help their horses stay somewhat straight
In this pattern, riders hold 2-point from the first to the second cone the first time around, then they hold 2-point from the first to the third during the second lap, and they progress to holding one cone longer each additional lap. Don’t forget to change directions!
Make the pattern extra challenging:
1. Have riders do “Airplane 2-point” with arms out to the side (instructor or volunteers should be heading the horse)
2. Have riders drop their stirrups and do 2-point without stirrups!

Arena Pattern Suggestion #4
This pattern focuses on teaching riders rein management to enable them to have appropriate rein length during 2-point so they can continue to steer their horse.
At the first cone the rider starts to shorten their reins, taking care to start reaching forward up their horse’s neck so they do not pull on the face. At the second cone the rider goes up in 2-point and keeps their horse walking along the rail. At the second to last cone the rider sits and has their reins lengthened back to ‘regular walking length’ by the last cone and before the corner.
How to shorten and lengthen the reins should be taught or reviewed before starting this pattern. I like teaching the rein management at a whoa so I can be hands on with the rider(s) if needed.

Arena Pattern Suggestion #5
This arena pattern is a great way to combine change of rein across the diagonal and keeping the horse going straight along the rail. Again, when explaining this pattern, it helps to tell the riders to go ‘around the cones in the corners’.
For additional challenge add in 2-point along the straight aways (Combine with #3 or #4).

Arena Pattern Suggestion #6
This arena pattern is a nice intro to trot work on the straight aways. This patter could be used with a rider who is fully supported or for a rider who is learning to ride their horse more independently at the trot.
Preparing for upward (walk to trot) and downward (trot to walk) transitions is emphasized in this pattern by giving specific visual markers of where the rider needs to prepare for the transitions.
This pattern is a good ‘intro’ trot pattern because the trots are on the straight aways against the rail. Trotting through corners or away from a rail are more difficult skills even if the rider has the support of a team.
You could also incorporate shortening and lengthening reins for trot work into this patter during the ‘prepare for trot’ and ‘transition to walk’ portions.
Tips for ALL patterns listed above:
1. Have the pattern printed out as a visual for your riders (and your volunteers!). Have them trace the pattern with their finger as you verbalize the steps (teaching kinestheticaly, visually, and verbally). Make sure you school your horses to accept paper near them if you have them trace the pattern in class.
2. Have a whiteboard with the cones drawn out. Have your rider trace the pattern, point out the cones, etc. as you explain the pattern.
3. If suitable for your rider, a fun twist could be to have your rider teach the pattern to their volunteers or to you by using the paper or whiteboard.
Need some colorful cones? CLICK HERE
Written by Saebra Pipoly. Learn more about the author by clicking here.
Send Saebra an email at saebra.p@hooffallsandfootfalls.com, subscribe to the Hoof Falls & Footfalls newsletter, follow on instagram, and subscribe to the YouTube channel!